Create a remote repository and push
1 | git init |
1 | git init |
1 | /** |
1 | /** |
Cloud computing is the delivery of on-demand computing resources—everything from applications to data centers—over the Internet on a pay-for-use basis.
Since 2006 when Amazon introduced the Elastic Compute Cloud
Features:
Bad
Types
EC2 allows scalable deployment of applications by providing a Web service through which a user can boot an Amazon Machine Image to create a virtual machine, which Amazon calls an “instance”, containing any software desired. A user can create, launch, and terminate server instances as needed, paying by the hour for active servers, hence the term “elastic”.
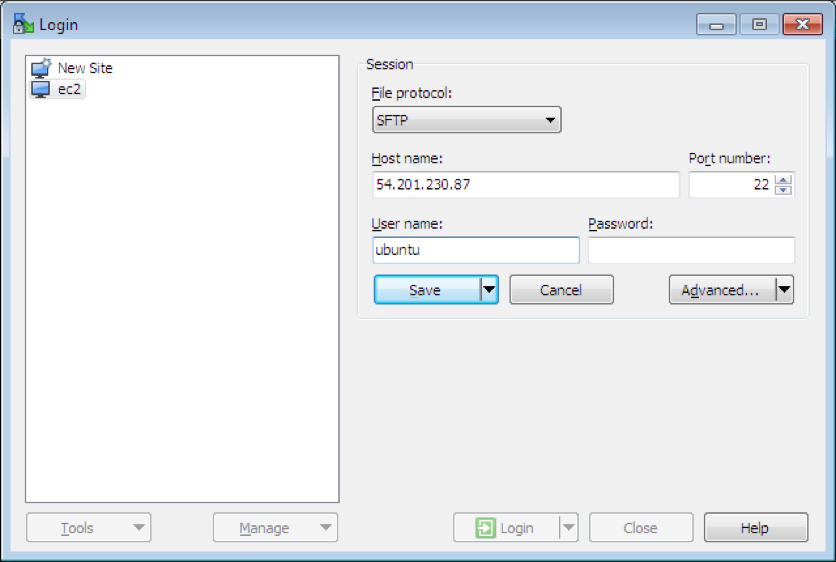
Step 1, go to http://aws.amazon.com, sign into your account and then open EC2 dashboard. Launch an instance.
Step 2, Select the Ubuntu Server 16.04 image.
Step 3, Use t2.micro as instance, which is free tier eligible. Click next instead of launch.
Step 4, Jump to security group setup. You need to add 2 more TCP ports: 80, 8080.
Step 5, Click Launch, you will be asked to create a new key pair and download the private key. You can name it as mykey.pem
Open your terminal, run:1
2chmod 600 ~/Downloads/mykey.pem
ssh -i ~/Downloads/mykey.pem ubuntu@YOUR_INSTANCE_IP
if asked “Are you sure you want to continue connecting (yes/no)? ”, type “yes”, enter.
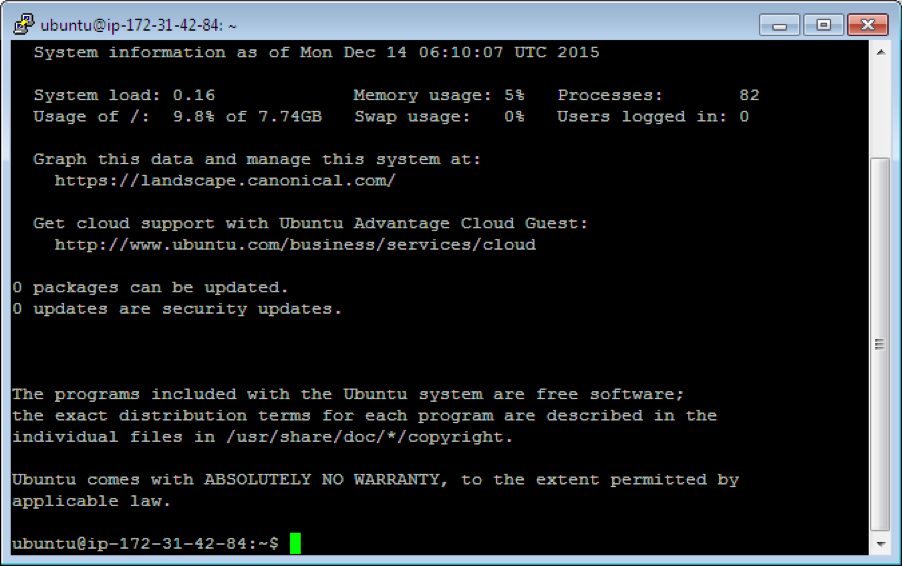
You are now on the remote server, you can play with Linux commands. hostname, ifconfig, whoami, uptime, pwd, ls
Windows (Putty)
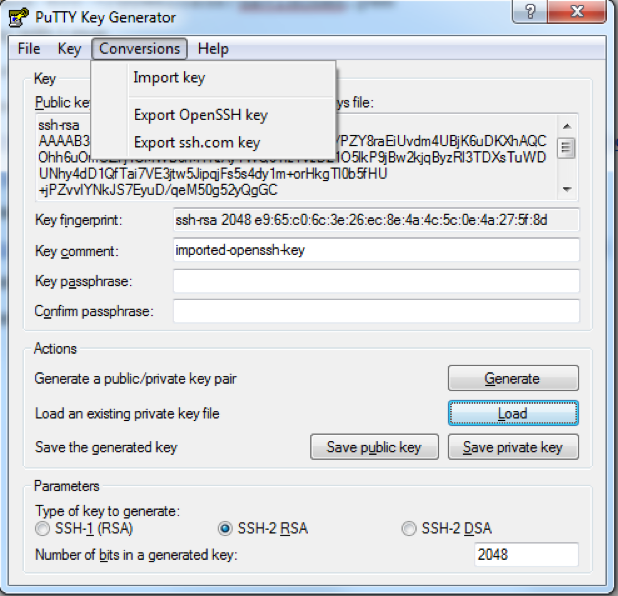
Download Putty and Puttygen from https://the.earth.li/~sgtatham/putty/latest/x86/putty.zip
Open Puttygen, “Conversions”->”Import key”, select mykey.pem file, Save private key as mykey.ppk
Step 1, In your instance’s terminal, execute the following commands:
Step 2, You can verify with
Step 1, sudo apt-get install mysql-server. When you are asked for new mysql password, use “root”.
Step 2, after installation, type mysql -u root -p in your terminal, then input the “root” as password.
Step 3, In the mysql shell, paste the following SQL statements to install the tables:
1 | DROP DATABASE IF EXISTS myproject; |
Step 4, Type “exit” to quit mysql shell.
Step 1, Execute the following commands1
2
3
4
5
6
7
8cd /opt/
sudo wget http://apache.mirrors.hoobly.com/tomcat/tomcat-9/v9.0.19/bin/apache-tomcat-9.0.19.tar.gz
sudo tar xzf apache-tomcat-9.0.8.tar.gz
sudo ln -s apache-tomcat-9.0.8 tomcat
echo "export CATALINA_HOME=\"/opt/tomcat\"" >> ~/.bashrc
source ~/.bashrc
cd /opt/tomcat
sudo bin/startup.sh
Step 2, Verify with http://YOUR_INSTANCE_IP:8080/
WAR file (or Web application ARchive) is a JAR file used to distribute a collection of JavaServer Pages, Java Servlets, Java classes, XML files, tag libraries, static web pages (HTML and related files) and other resources that together constitute a web application.
Step 1, Open Eclipse and MAMP, verify your website works correctly on local environment:
http://localhost:8080/Jupiter/
Step 2, open your MySQLDBUtil.java, change and make sure port is 3306, and username and password are root.
3306 is default port in MySQL
Step 3, In Eclipse, select File -> Export -> Web->war File, save the war file to disk.
Step 4, Copy the war file to your instance.
MAC:
Open a new terminal window and type:1
scp -i ~/Downloads/mykey.pem ~/Downloads/Jupiter.war ubuntu@YOUR_INSTANCE_IP:~/
Windows (MSYS2):
1 | scp -i /c/Users/<YOUR_USERNAME>/Downloads/mykey.pem /c/Users/<YOUR_PATH>/Jupiter.war ubuntu@YOUR_INSTANCE_IP:~/ |
Windows (putty):
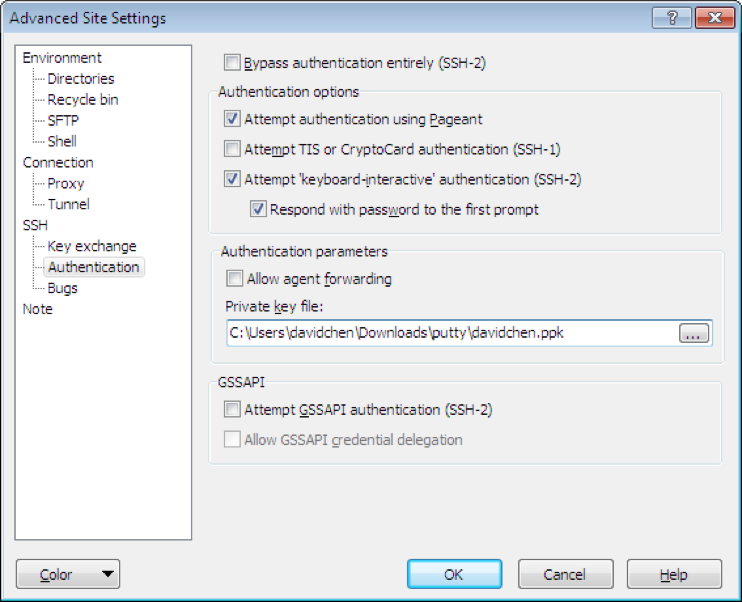
use WinSCP, https://winscp.net/download/WinSCP-5.13.2-Setup.exe
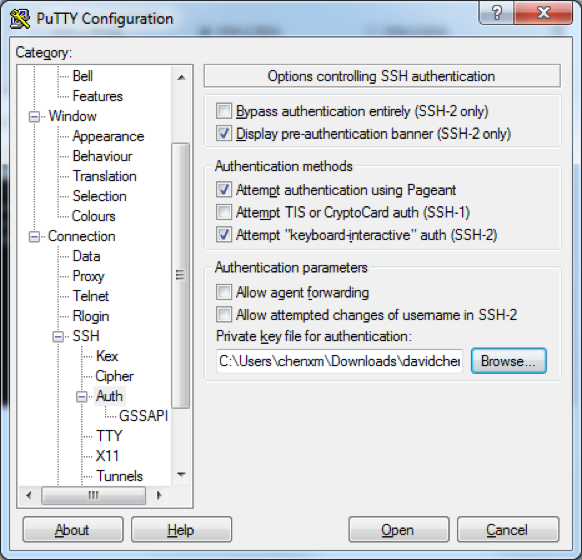
Click Advanced->SSH->Authentication->Private key file: choose *.ppk
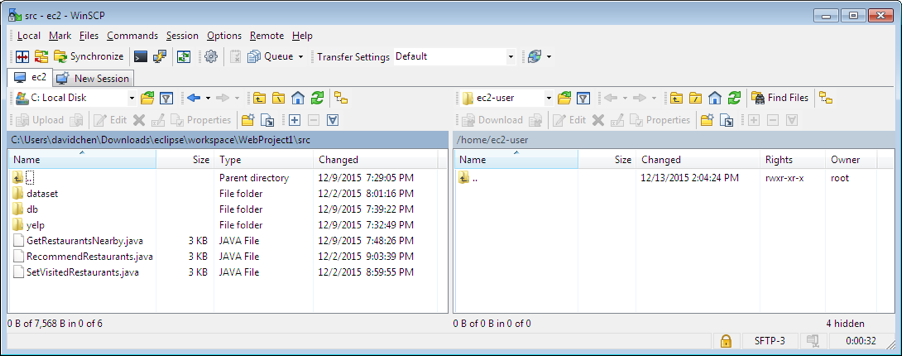
Drag the Jupiter.war to the left (into /home/ubuntu/).
Step 5, Both Mac and Windows, back to your terminal/putty, type the following command
1 | sudo cp ~/Jupiter.war /opt/tomcat/webapps/ |
Step 6, Wait for a few seconds, then you can verify the server on your browser:
http://YOUR_INSTANCE_IP:8080/Jupiter/
Redeploy application: redo step 3-5.
此处需要将eclipse的jdk jre compiler全部设为1.8并重新编译,即可解决版本问题。
Step 1, On the remote command-line terminal, edit the tomcat configuration by:
1 | sudo vim /opt/tomcat/conf/server.xml |
Step 2, Press i to enter edit mode, scroll down to find the following line (around line 69):
1 | <Connector port="8080" protocol="HTTP/1.1" |
Step 3, Press ESC to exit edit mode, then type :wq to save and exit.
Step 4, Restart tomcat by:
1 | sudo /opt/tomcat/bin/shutdown.sh |
Step 5, Visit http://YOUR_IP_ADDRESS/Jupiter/ to see if the server is started correctly.
此处端口设为80,以后访问时就不需要再额外输入端口号了
Step 1, On you instance’s terminal, type the following command:
1 | sudo vim /etc/init.d/tomcat |
Step 2, Press i to enter the INSERT mode, then paste the following contents:
1 |
|
Step 3, Press Esc to exit INSERT mode, then type :wq to save and quit.
Step 4, Make the new file executable:
1 | sudo chmod +x /etc/init.d/tomcat |
Step 5, update bashrc to catch your script:
1 | sudo update-rc.d tomcat defaults |
Step 6, (optional) you can use sudo /etc/init.d/tomcat restart to manually restart tomcat.
Your web app may be not that stable to run for months. You can restart it every night to keep it healthy.
Step 1, On you instance’s terminal, type the following command:
1 | sudo crontab -e |
Step 2, Input 3 to select vim.basic as the editor
Step 3, Move the cursor to the end, press i to enter edit mode. Input the following, It means restart tomcat at 1:00 and 13:00 UTC everyday.:
1 | 0 1,13 * * * sudo /etc/init.d/tomcat restart |
定时在1:00和13:00tomcat重启
Step 4, Press Esc to exit INSERT mode, then type :wq to save and quit.
You can check Java error from Tomcat runtime log. Location:
1 | /opt/tomcat/logs/localhost.<date>.log |
ps aux|grep tomcat1 | root 17273 78.3 7.9 2225932 80404 pts/0 Sl 20:30 0:02 /usr/bin/java -Djava.util.logging.config.file=/opt/tomcat/conf/logging.properties -Djava.util.logging.manager=org.apache.juli.ClassLoaderLogManager -Djdk.tls.ephemeralDHKeySize=2048 -Djava.protocol.handler.pkgs=org.apache.catalina.webresources -Dorg.apache.catalina.security.SecurityListener.UMASK=0027 -Dignore.endorsed.dirs= -classpath /opt/tomcat/bin/bootstrap.jar:/opt/tomcat/bin/tomcat-juli.jar -Dcatalina.base=/opt/tomcat -Dcatalina.home=/opt/tomcat -Djava.io.tmpdir=/opt/tomcat/temp org.apache.catalina.startup.Bootstrap start |
17273 is the process id
1 | Sudo kill -9 17273 |
AJAX is not a programming language.
AJAX just uses a combination of:
AJAX 可以实现异步通信
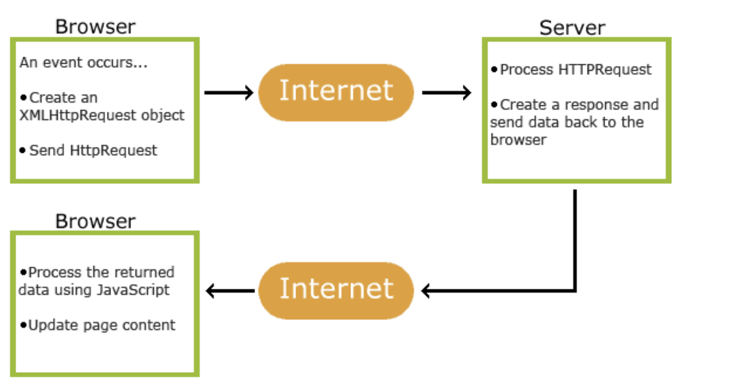
The keystone of AJAX is the XMLHttpRequest object.
1 | var xhttp = new XMLHttpRequest(); |
open() and send() methods of the XMLHttpRequest object1 | xhttp.open("GET", "ajax_info.txt", true); |
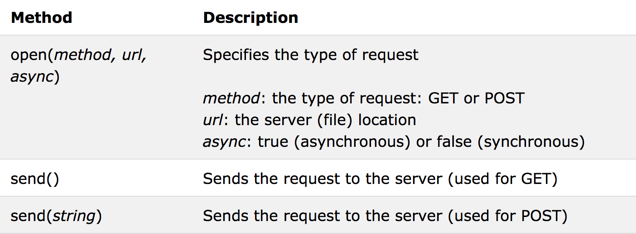
GET is simpler and faster than POST, and can be used in most cases.
However, always use POST requests when:
demo of our web applications: http://34.211.21.63/Event/
http://jsbin.com/hocukukiva/edit?html,css,js
将JSBin里面的代码分别放在:1
2
3/WebContent/index.html
/WebContent/styles/main.css
/WebContent/scripts/main.js
访问: http://localhost:8080/Jupiter
自动跳转至index.html
https://developer.mozilla.org/en-US/docs/Web/API/HTMLElement/dataset
1 | font-size: 0.9em; |
1 | // Run all following scripts |
1 | var user_id = '1111'; |
1 | init(); |
1 | /** |
1 | /** |
1 | function initGeoLocation() { |
1 | function onPositionUpdated(position) { |
1 | function onLoadPositionFailed() { |
1 | function getLocationFromIP() { |
1 | /** |
1 | /** |
1 | function showLoadingMessage(msg) { |
1 | /** |
1 | /** |
1 | /** |
1 | /** |
ItemHistory.java, update doGet method.1 | /** |
Widely exists in industry and it is a popular interview question.
Facebook: news feed, friends, ‘Do you know this friend?’的例子
LinkedIn: jobs, companies, acquaintances, ‘Are you interested in this job?’的例子
Amazon: 电饭锅的例子
Google Ads: 两颗红豆的例子
Given a user, fetch all the events (ids) this user has visited. (which table? which API?)
1 | //history: history_id, user_id, item_id, last_favor_time. |
given all these events, what are the categories? (which table? which API?)
1 | //categories: item_id, category. |
given these categories, what are the events that belong to them (which table? which API?)
1 | //external API |
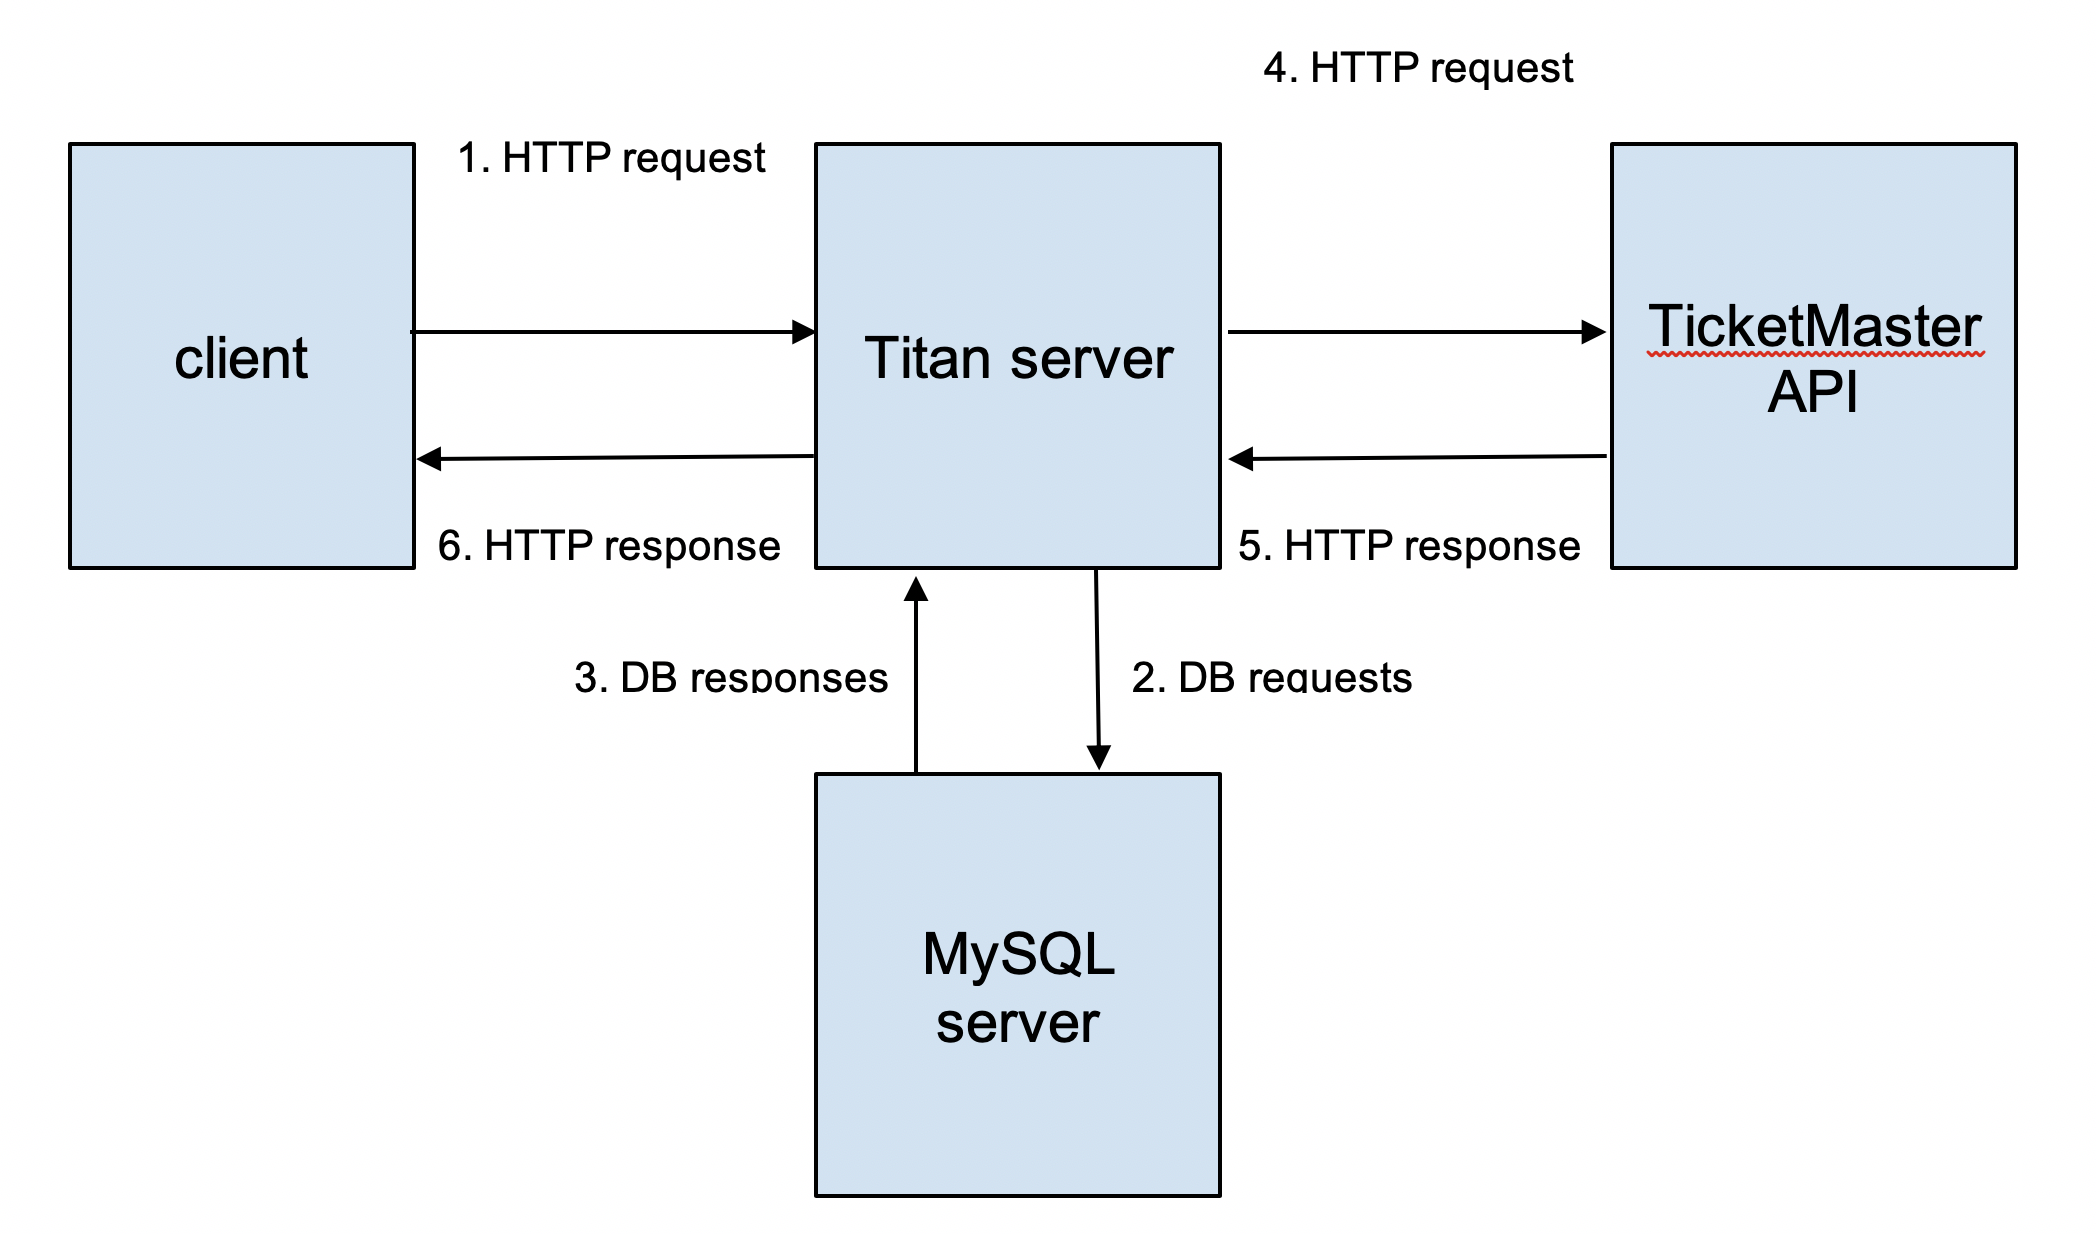
src/algorithm. Add GeoRecommendation.java.Idea of this algorithm: First get the current user’s favourite items, then get all categories of this user’s favorites, sort them by descending order. Then get these categories, search items again, sort this items with distance(Ascending order), and add those items to the result. Category > Distance.
1 | public List<Item> recommendItems(String userId, double lat, double lon) { |
src/rpc/RecommendItem.java, implement doGet()method.1 | /** |
Since we’re using set to save results from our recommendation function, we need do the de-duplication based on item_id. So go to Item.java, add hashCode() and equals().
Eclipse provides an easy way to add this two methods. Careful, only select itemId when generating these methods.
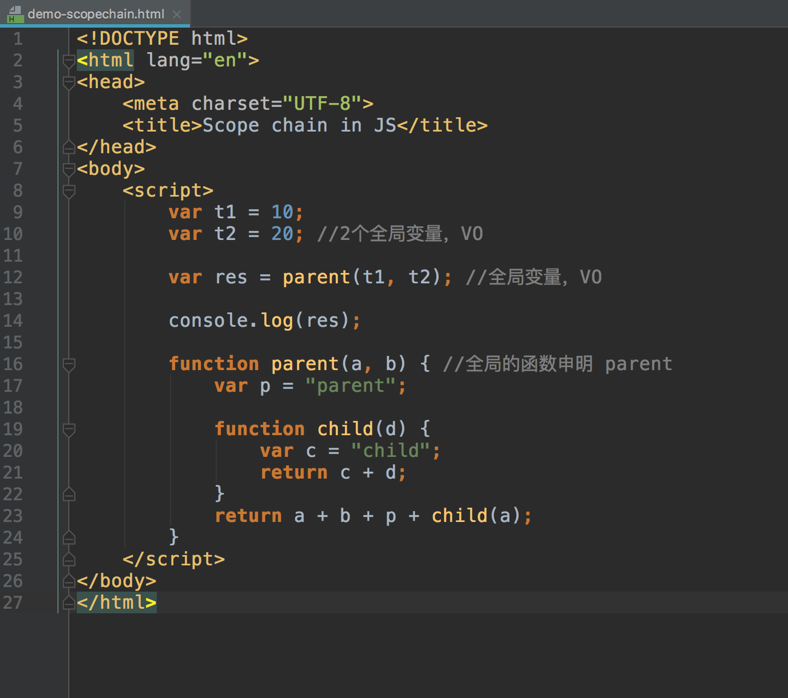
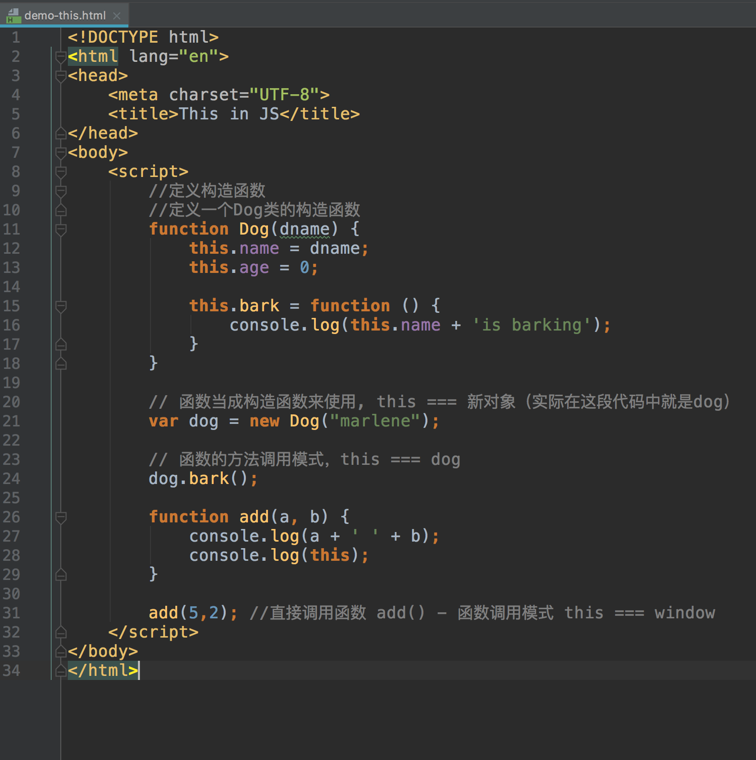
In JavaScript there are two types of scope:
Scope determines the accessibility (visibility) of these variables.
Variables defined inside a function are not accessible (visible) from outside the function.
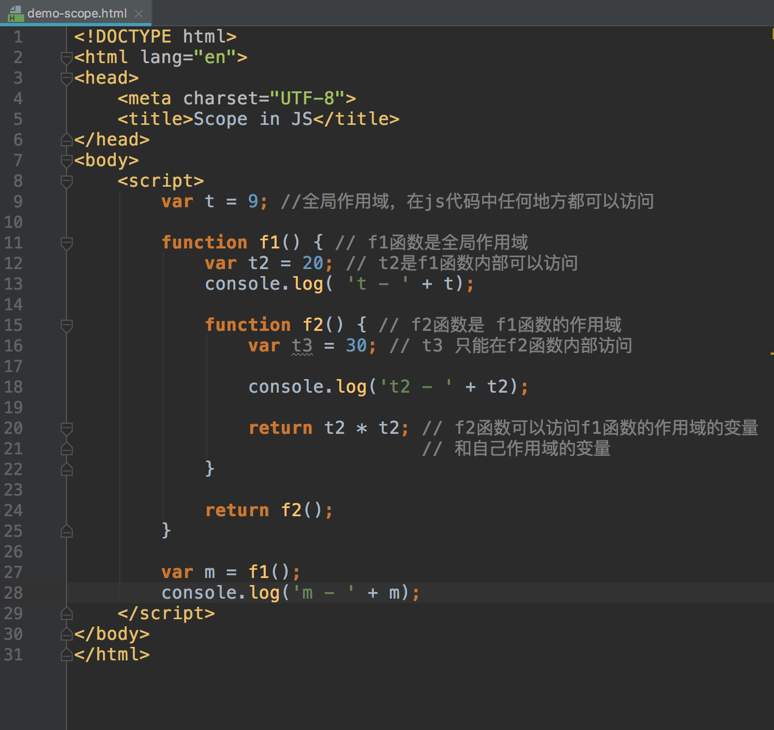
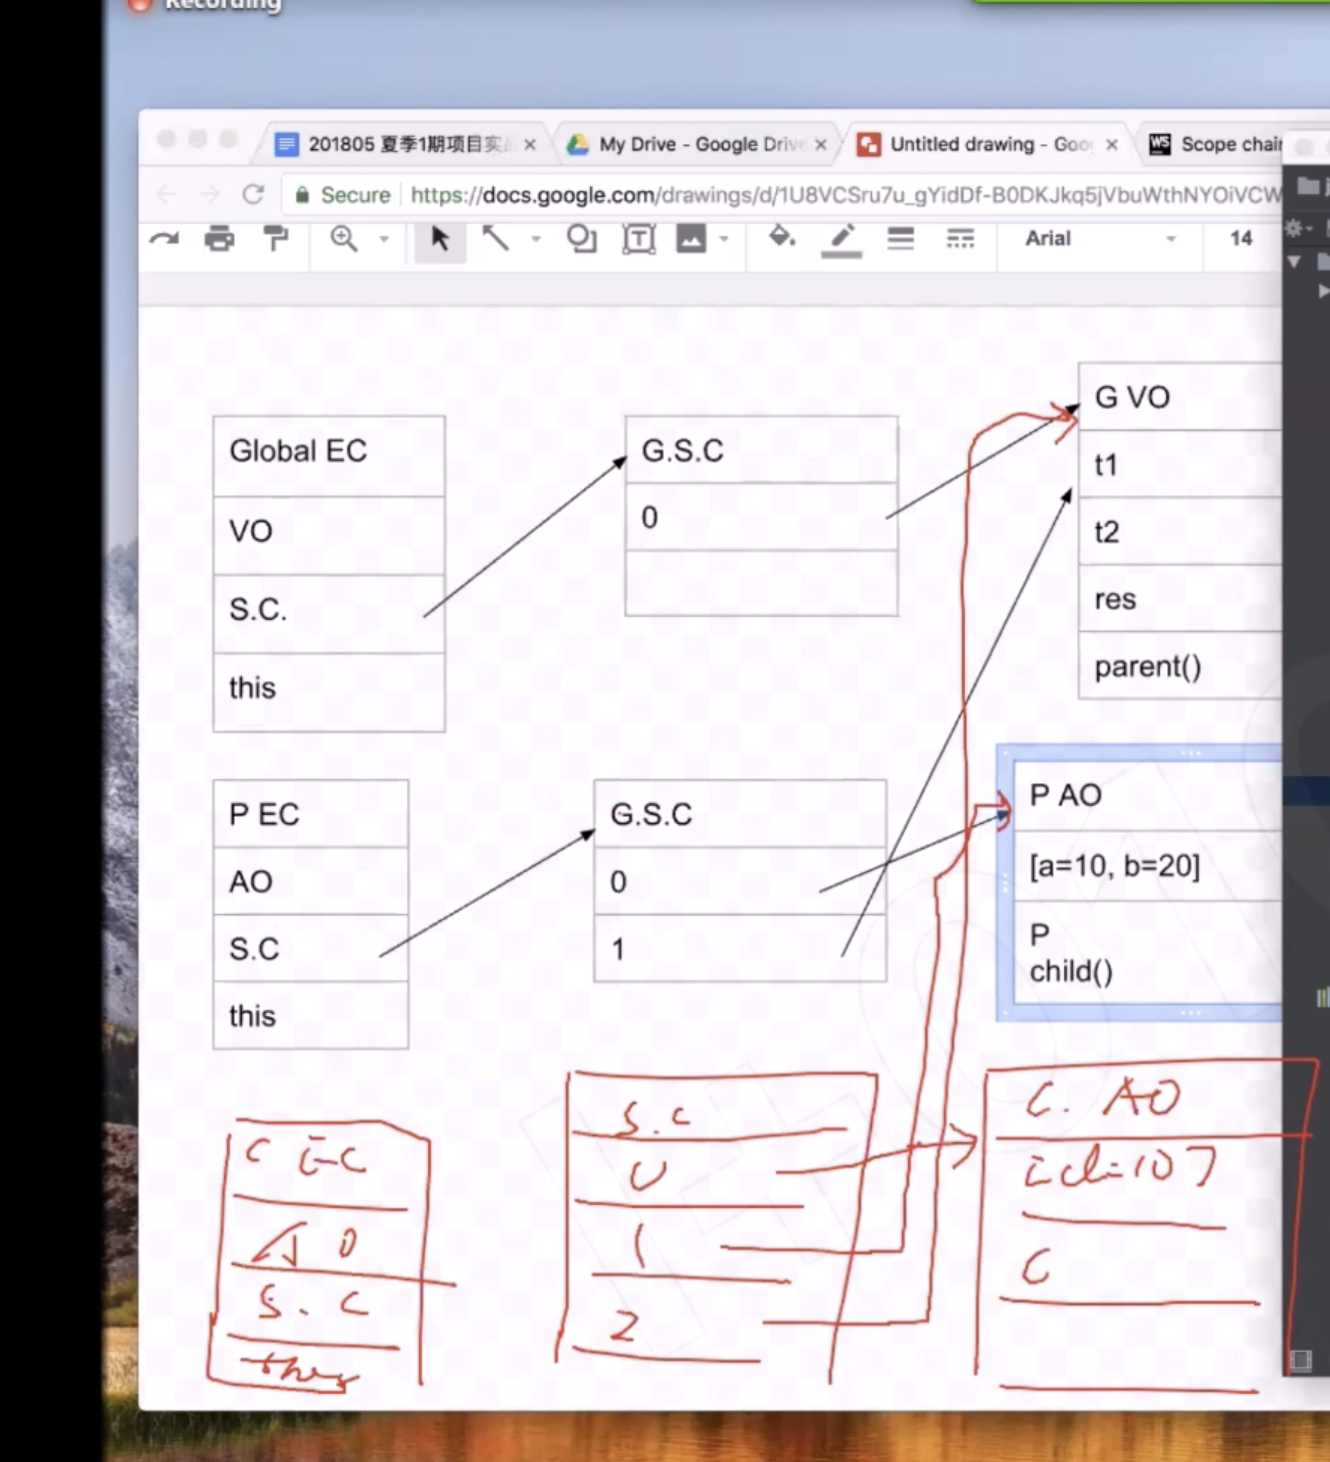
The scope chain property of each execution context is simply a collection of the current context variable object + all parent’s lexical variable objects.
1 | <script> |
A closure is a function having access to the parent scope, even after the parent function has closed.
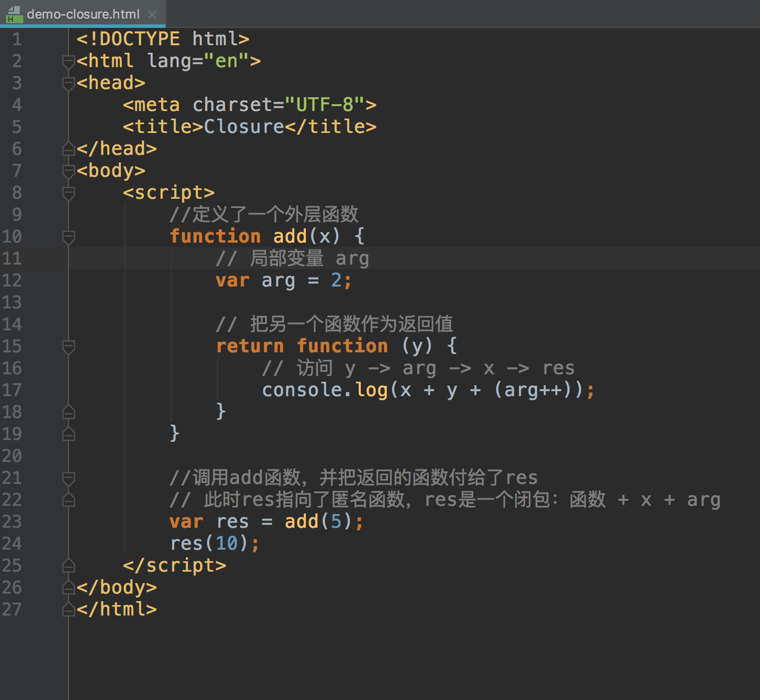
Closure here includes the annonymous function and the local variable arg. Here the local variable won’t be released even add() is ended.
examples: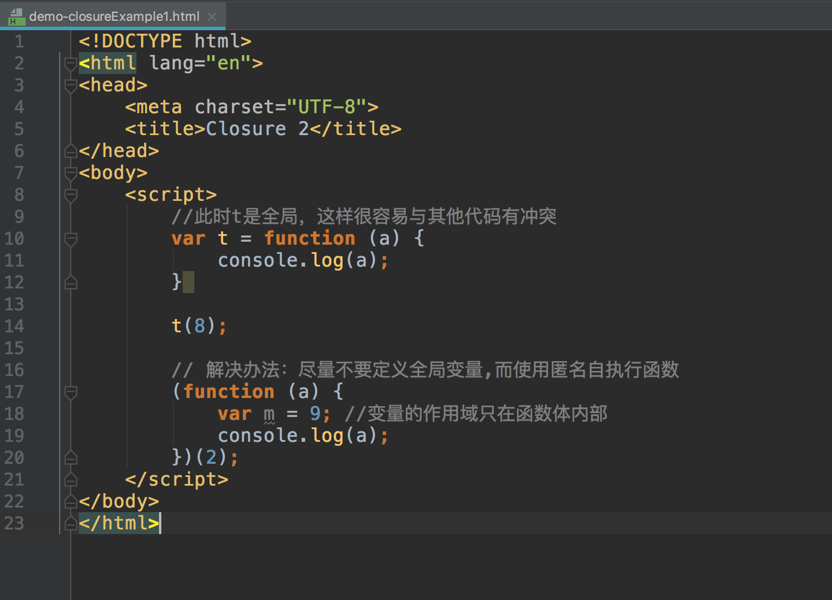
There are no official standards for the Browser Object Model (BOM).
Since modern browsers have implemented (almost) the same methods and properties for JavaScript interactivity, it is often referred to, as methods and properties of the BOM.
The BOM (Browser Object Model) consists of the objects navigator, history,screen, location and document which are children of window
The Document Object Model (DOM) connects web pages to scripts or programming languages. Usually that means JavaScript. The DOM model represents a document with a logical tree. DOM methods allow programmatic access to the tree; with them you can change the document’s structure, style or content. DOM nodes can have event handlers attached to them. Once an event is triggered, the event handlers get executed.
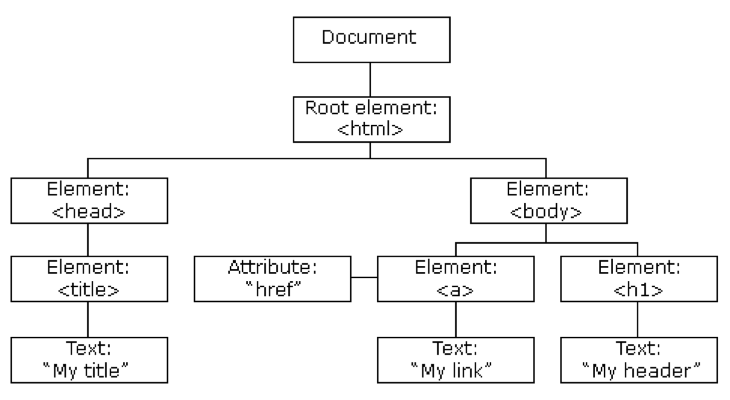
| Method | Description |
|---|---|
| document.getElementById(id) | Find an element by element id |
| document.getElementsByTagName(name) | Find elements by tag name |
| document.getElementsByClassName(name) | Find elements by class name |
| Method | Description |
|---|---|
| element.innerHTML = new html content | Change the inner HTML of an element |
| element.attribute = new value | Change the attribute value of an HTML element |
| element.setAttribute(attribute, value) | Change the attribute value of an HTML element |
| element.style.property = new style | Change the style of an HTML element |
| Method | Description |
|---|---|
| document.createElement(element) | Create an HTML element |
| document.removeChild(element) | Remove an HTML element |
| document.appendChild(element) | Add an HTML element |
| document.replaceChild(element) | Replace an HTML element |
| document.write(text) | Write into the HTML output stream |
Capturing phase – the event goes down to the element.Bubbling phase – the event bubbles up from the element.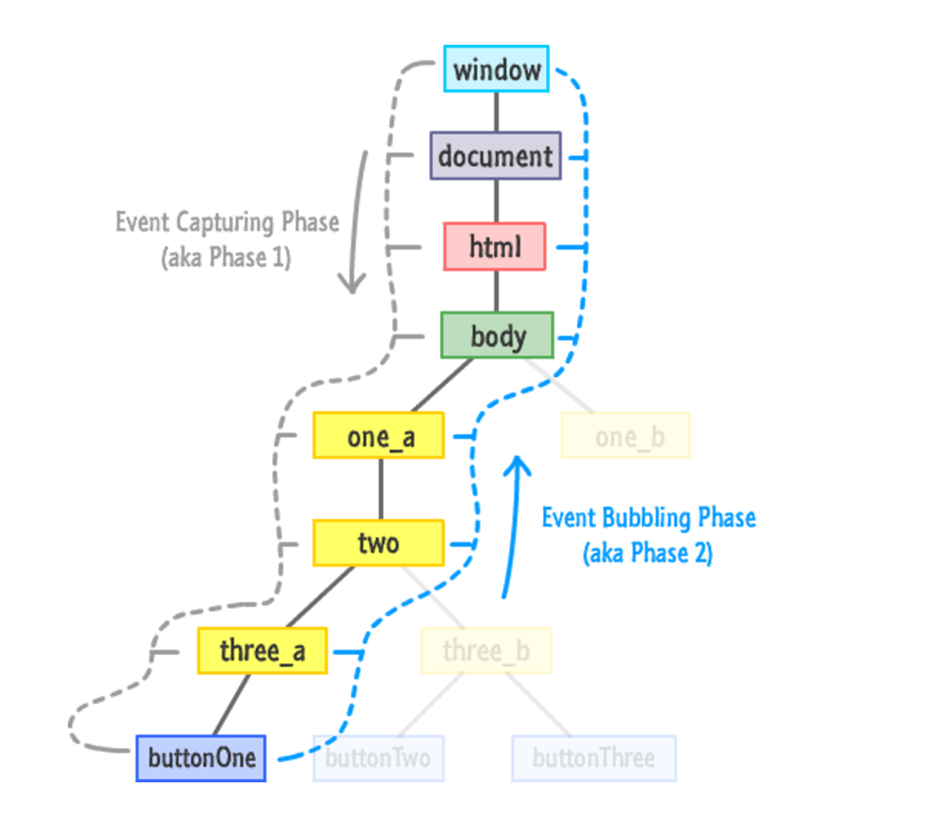
Don’t write JS code inline.
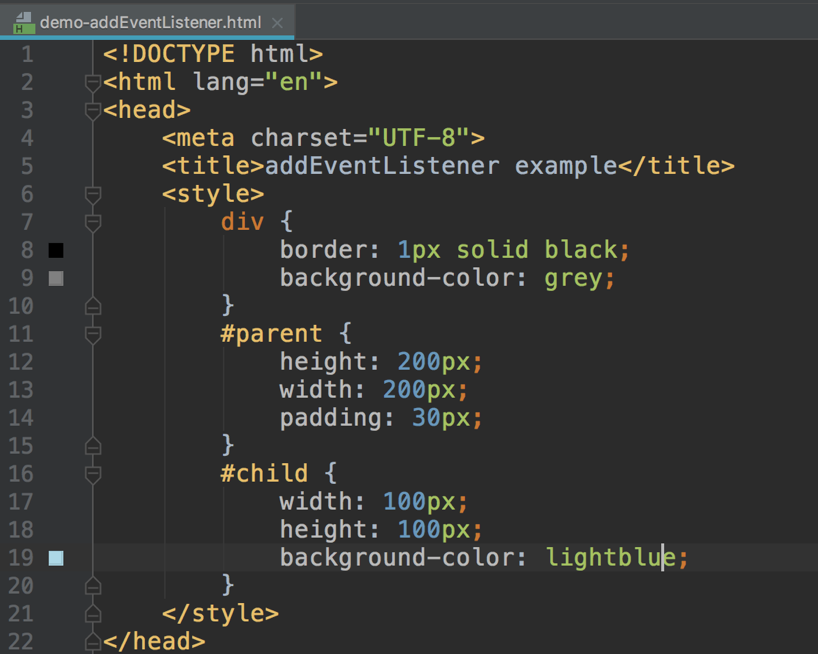
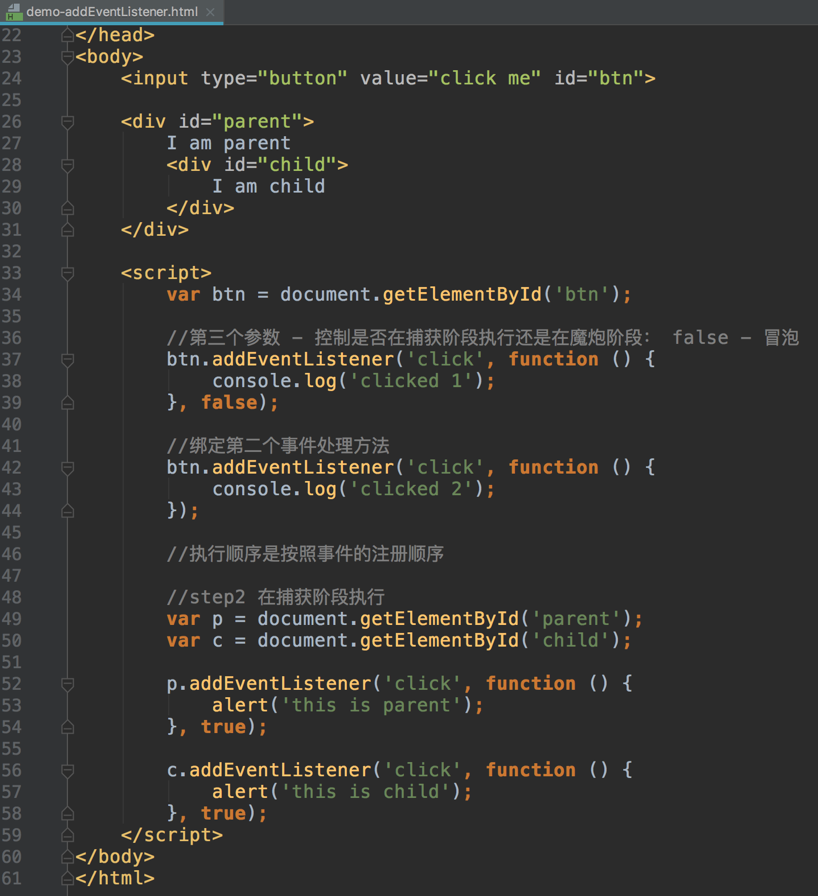
捕获阶段与冒泡阶段区别在于谁先触发
Example:
db.mysql package, create class/MySQLConnection.java. DBConnection interfaceclose method and constructor.1 | // connection |
searchItems() in MySQLConnection. Previously we call TicketMasterAPI.search from our SearchItem servlet directly. But actually our recommendation code also needs to call the same search function, so we make a designated function here to do the search call.SearchItem.java.1 | /** |
searchItem, let’s try saveItem to save data into database. Again, careful with the import suggestions. Always choose java.sql.*.1 | /** |
Use PreparedStatement and stmt.settring() can effectively avoid SQL injection.
PreparedStatement is faster than raw String. Only have to create it once.
1 |
|
DBConnectionFactory.1 | public static DBConnection getConnection(String db) { |
src/rpc/SearchItem.java, add a private dbconnection field and update doGet().1 | /** |
1 | /** |
create a new servlet called ItemHistory, update the url mapping to \history
create a new function in RpcHelper.java to parse HTTP request body. Imagine the input HTTP request looks like:
1 | { |
1 | /** |
doPost() and doDelete in ItemHistory.java to use this new function. 1 | /** |
post method, use http://localhost:8080/Jupiter/history, then copy the following JSON object into body. Replace item_id1 and item_id2 with the real item_id exist in your item table.1 | { |
delete, use http://localhost:8080/Jupiter/history, then copy the following JSON object into body. Again replace item_id1 with the real item_id exist in your history table.1 | { |
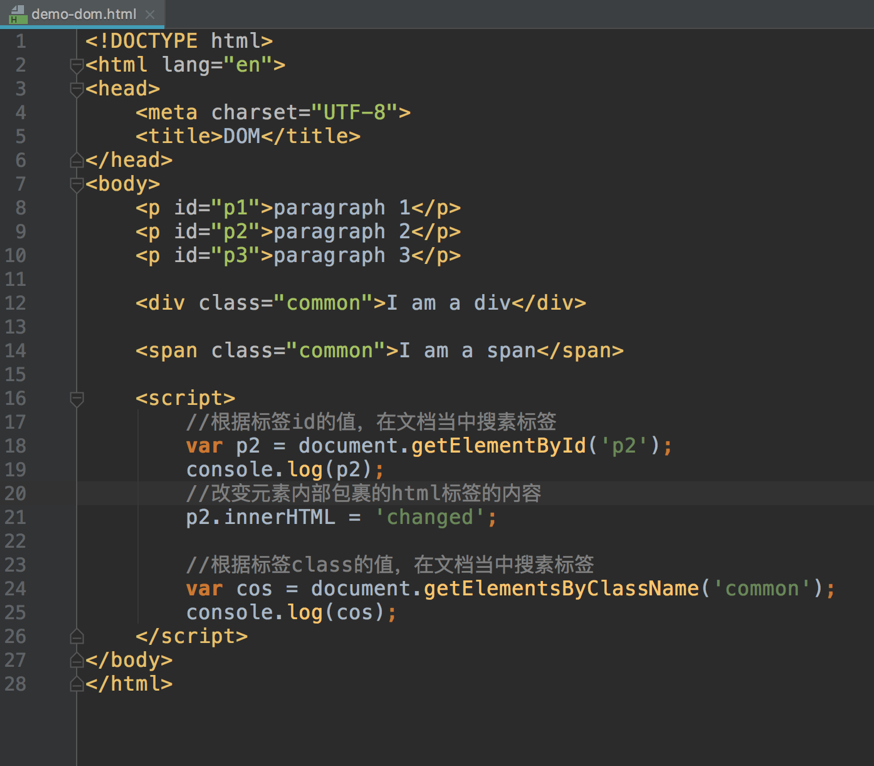
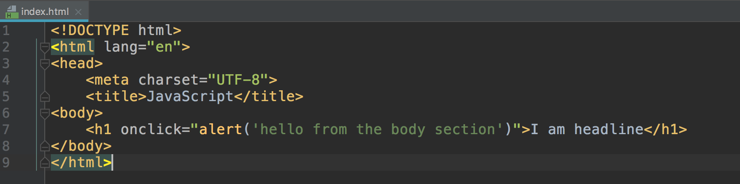
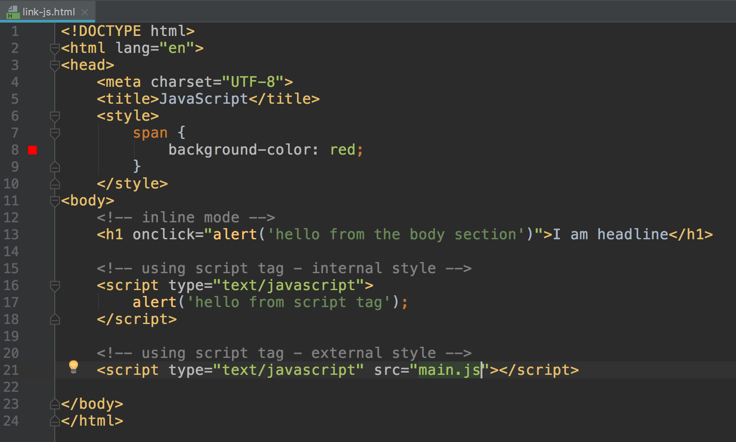
You can add JavaScript code in an HTML document by employing the dedicated HTML tag<script> that wraps around JavaScript code.
The <script> tag can be placed in the <head> section of your HTML, in the <body> section, or after the </body> close tag, depending on when you want the JavaScript to load.
不便于代码分离
<script> tagThe <script> tag can be placed in the <head> section of your HTML, in the <body> section, or after the </body> close tag, depending on when you want the JavaScript to load.
浏览器先执行完
<script>tag才会渲染其他组件
We use those three keywords to create variables in JavaScript. Example: let message; or var message; or const message;
JavaScript is “dynamically typed”, meaning that there are data types, but variables are not bound to any of them.
Number, String, Boolean, Object, Function, Null, UndefinedNumber - The number type serves both for integer and floating point numbers: 123, 12.22..
Note: NaN belong to the type number but it’s not “normal” numbers. NaN represents an error.
String - A string may consist of only one character or many of them. Double and single quotes have no difference between them in JavaScript. E.g. ‘aba’, “I am a string.”
Boolean - The boolean type has only two values: true and false.
Null - A special value which is for unknown values.
In JavaScript null is not a “reference to a non-existing object” or a “null pointer” like in some other languages.
It’s just a special value which has the sense of “nothing”, “empty” or “value unknown”.
Example: var age = null;
The code above states that the age is unknown or empty for some reason.
Undefined - A special value which is for unassigned values. The meaning of undefined is “value is not assigned”.
Undefined 和 null 不是数据类型,而是特殊值
typeof Operator returns the type of the argument. It’s useful when we want to process values of different types differently, or just want to make a quick check.
e.g. typeof “abc” - string
A comparison returns a value. The value is of the boolean type: true or false.
a > b, a < b.a >= b, a <= b.a == b (please note the double equation sign =. A single symbol a = b would mean an assignment).≠, in JavaScript it’s written as an assignment with an exclamation sign before it: a != b.Note:
A regular equality check == has a problem. It cannot differ 0 from false:
1 | 0 == false // true |
That’s because operands of different types are converted to a number by the equality operator ==. An empty string, just like false, becomes a zero.1
Number(false) => 0, Number(“”) => 0
What to do if we’d like to differentiate 0 from false?
A strict equality operator === checks the equality without type conversion.
In other words, if a and b are of different types, then a===b immediately returns false without an attempt to convert them.
1 | 0 === false // false |
Functions are the main “building blocks” of the program. They allow the code to be called many times without repetition.

The function keyword goes first, then goes the name of the function, then a list of parameters between the parentheses (empty in the example above) and finally the code of the function, also named “the function body”, between curly braces.

The meaning of these code samples is the same: “create a function and put it into the variable sayHi”.
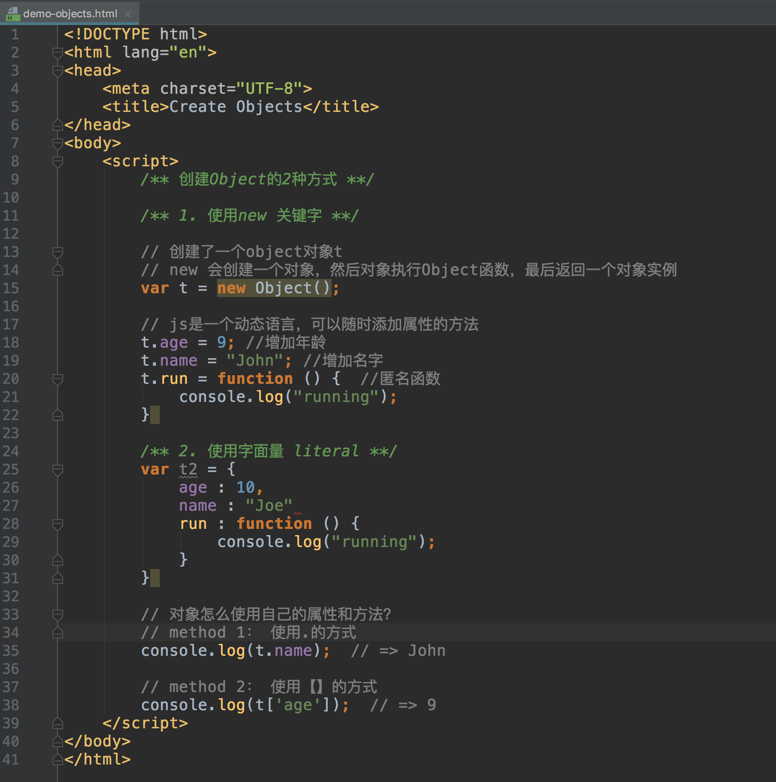
e.g. Dog object: age, name, color, breed attributes, and run() activity.
How to create an instance of object
using new keyword
E.g.
1 | var car = new Car(); |
using literal {} 字面量
E.g. var car = { color: ‘red’, type: ‘suv’};
Use . or [] to visit attributes.
eg
1 | t2.name; |
example
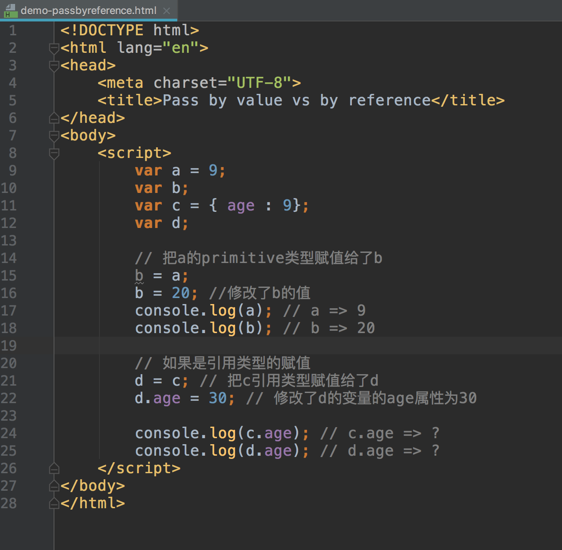
Difference:
A primitive type has a fixed size in memory. For example, a number occupies eight bytes of memory, and a boolean value can be represented with only one bit. A reference type does not have a fixed size in memory.
Primitive types are assigned/copied “as a whole value”, but reference types are stored and copied “by reference”.
A variable stores not the object itself, but its “address in memory”, in other words “a reference” to it.
When an object variable is copied.the reference is copied, the object is not duplicated.
In terms of function:
In Pass by Value, function is called by directly passing the value of the variable as the argument. Changing the argument inside the function doesn’t affect the variable passed from outside the function.
In Pass by Reference, function is called by directly passing the reference/address of the variable as the argument. Changing the argument inside the function affect the variable passed from outside the function.
example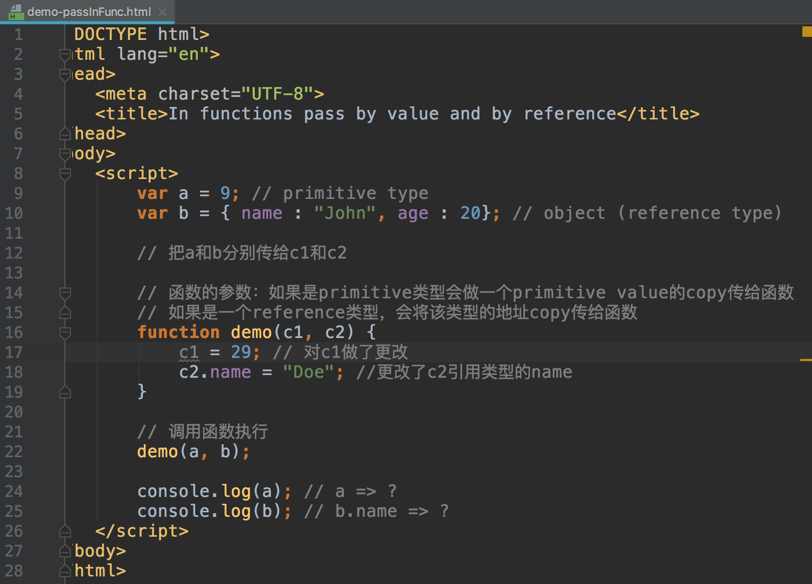
##
Hoisting 变量提升
Hoisting is a JavaScript mechanism where variables and function declarations are moved to the top of their scope before code execution.
Execution Context
Execution context stack
JavaScript engine creates the execution context in the following two stages: Creation phase and Execution phase.
In creation phase, JS engine performs the following task:
activation object or the variable object: activation object is a special object in JS which contain all the variables, function arguments and inner functions declarations information. scope chain: Once the activation object gets created, JS engine initializes the scope chain which is a list of all the variables objects inside which the current function exists. This also includes the variable object of global execution context. Scope chain also contains the current function variable object.this: After the scope chain, JavaScript engine initialize the value of ‘this’.In the execution phase, JS engines will again scan through the function to update the variable object with the values of the variables and will execute the code.
A database is an organized collection of data.
A database-management system (DBMS) is a computer-software application that interacts with end-users, other applications, and the database itself to capture and analyze data. A general-purpose DBMS allows the definition, creation, querying, update, and administration of databases.
We need to store some data set, a list of events with id, name, address, and date. What will you do? Text File? Excel?
A DBMS allows you to fulfill all requirement above easily.
MAMP stands for “My Apache, MySQL, and PHP”. MAMP is an integrated platform you can install on your machine which allows you to have access to a local MySQL server and its PHP server.
Click Preferences -> Ports. Make sure Apache Port is 8888 and MySQL port is 8889. Don’t worry about the Nginx port.
Start Server->open phpMyAdmin->create new project myproject->use utf8_general_ci as the collation
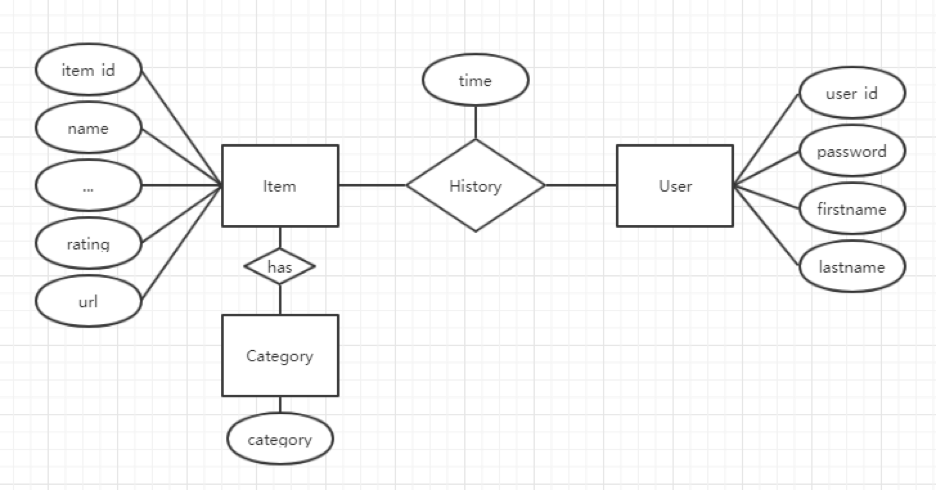
ER (entity-relationship) model:
CREATE TABLE history (item_id, user_id, ,... FOREIGN KEY item_id REFERENCE item(item_id))
users - store user information.
| User_id(primary key) | password | firstname | lastname |
|---|---|---|---|
| 1111 | abcd | Rick | Sun |
| 2222 | efgh | Matt | Yan |
items - store item information.| item_id(primary key) | name | rating | url |
|---|---|---|---|
| abcd | event1 | 5 | www.example1.com |
| efgh | event1 | 0 | www.example2.com |
category - store item-category relationshipIt’s an implementation detail, we could save category in item table, but there will be more string join/split manipulations in our code, so let’s save them in a separate table.
| item_id | category |
|---|---|
| abcd | party |
| efgh | party |
| efgh | sports |
Set item_id and category both as Primary Key, to map multiple items to multiple items.
history - store user favorite history| User_id(foreign key) => user(user_id) | item_id | time |
|---|---|---|
| 1111 | abcd | 01/01/2018 |
| 1111 | efgh | 01/02/2018 |
| 2222 | efgh | 01/03/2018 |
Unique key: a key in a relational database that is unique for each record. Primary key: Also a key that is unique for each record. Cannot be NULL and used as a unique identifier.Foreign key: a key used to link two tables together. A FOREIGN KEY is a field (or collection of fields) in one table that refers to the PRIMARY KEY in another table.Index: improves the speed of data retrieval operations on a database table at the cost of additional writes and storage space to maintain the index data structure. MySQL will create index on column which is declared as key.Structured Query Language is a programming language, which is used to communicate with DBMS. The standard language for relational DBMS.
Just like our Java servlet classes. JDBC provides interfaces and classes for writing database operations. Technically speaking, JDBC (Java Database Connectivity) is a standard API that defines how Java programs access database management systems. Since JDBC is a standard specification, one Java program that uses the JDBC API can connect to any database management system (DBMS), as long as a driver exists for that particular DBMS.
import java.sql.xxx;create a new package named db, then add a new interface called DBConnection. Will add support to MySQL and MongoDB later.
Add the basic function signature
1 | public interface DBConnection { |
Create a concrete class DBConnectionFactory, this class is used to create db instance
1 | public class DBConnectionFactory { |
create another package db.mysql, which will only contains mysql version of DBConnection implementation. Then create MySQLDBUtil class in db.mysql package.
1 | public class MySQLDBUtil { |
create a new class called MySQLTableCreation to automatically reset our tables in our database. So in the future, you can run this function every time when you think the data stored in you DB is messed up.
first let’s try to connect to MySQL through JDBC connection. Be careful, always use java.sql.* when eclipse ask you to import DB related packages.
1 | public class MySQLTableCreation { |
Question: What does this do Class.forName(“com.mysql.jdbc.Driver”).newInstance()?
Answer: Ensure the driver is registered. We use Class.forName("com.mysql.jdbc.Driver").getConstructor().newInstance(); to register jdbc.Driver class to DriverManager, then create an instance of it using conn = DriverManager.getConnection(MySQLDBUtil.URL);
此处为反射机制的应用
after connect to MySQL, let’s try to drop old tables if they’re existed.
Syntax: DROP TABLE IF EXISTS table_name;
1 | // Step 2 Drop tables in case they exist. |
create 4 tables: User, Item, Category, History. Syntax:
1 | CREATE TABLE table_name ( |
1 | // Step 3 Create new tables |
VarChar 指的是变长数组
last_favor_time TIMESTAMP NOT NULL DEFAULT CURRENT_TIMESTAMP指的是如果没有给值,默认用当前时间填充
com.mysql.jdbc.Driveris deprecated, change tocom.mysql.cj.jdbc.Driver
Add a fake user. We don’t have register function in our application, so let’s create a user in our database. Syntax:
1 | INSERT INTO table_name (column1, column2, column3, ...) |
1 | // Step 4: insert data |
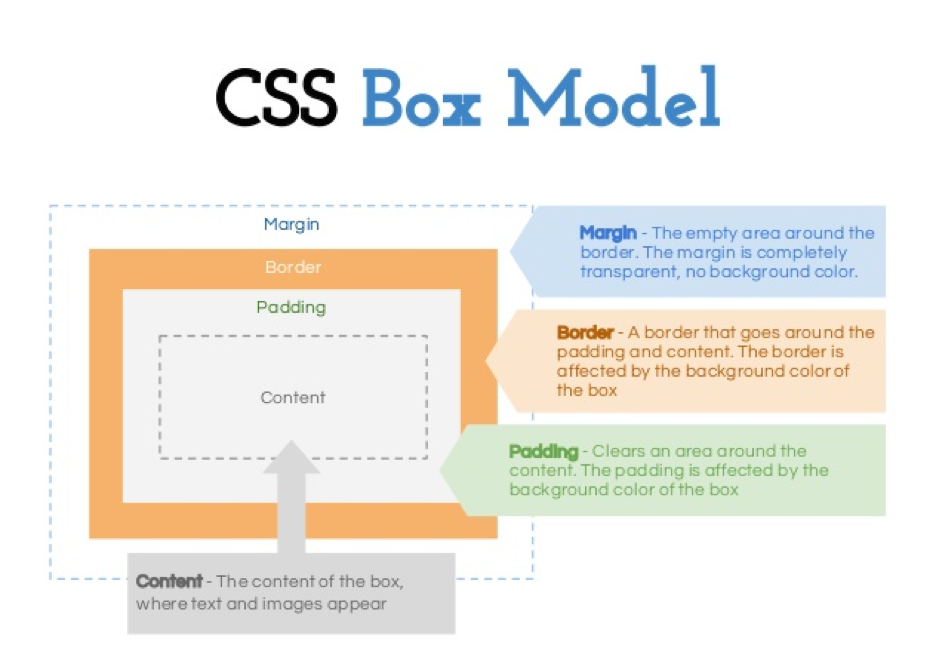
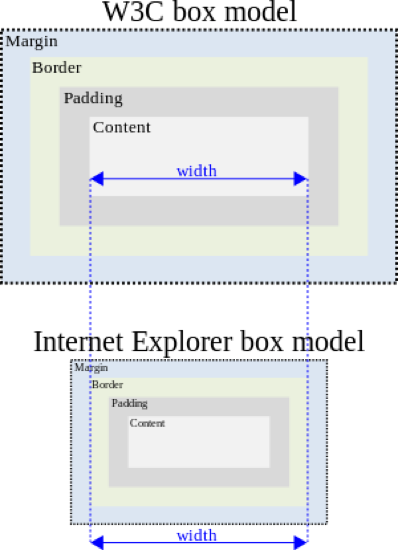
Every element on a page is a rectangular box.
There are actually two types of box model, one is W3C standard, the other is IE model. Basically they all calculate the element width and height based on the content width, content height, padding and border, but their formula are different:
W3C standard
1 | outer box (element space size) |
IE box model
1 | outer box (element space size) |
box-sizing: content-box || border-box || inherit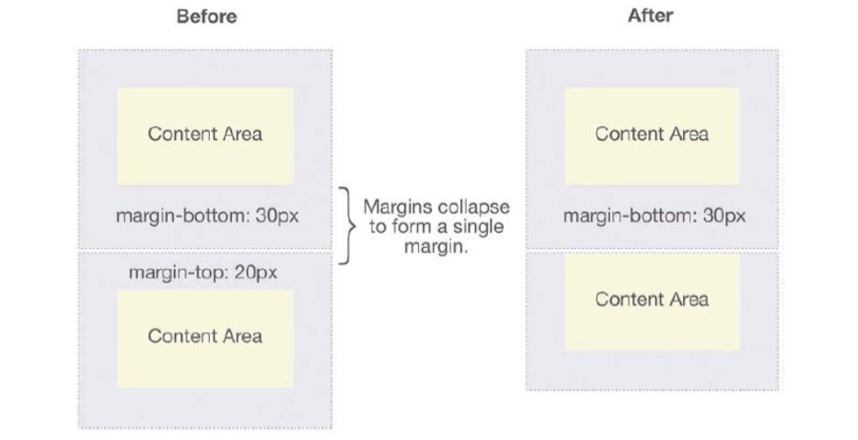
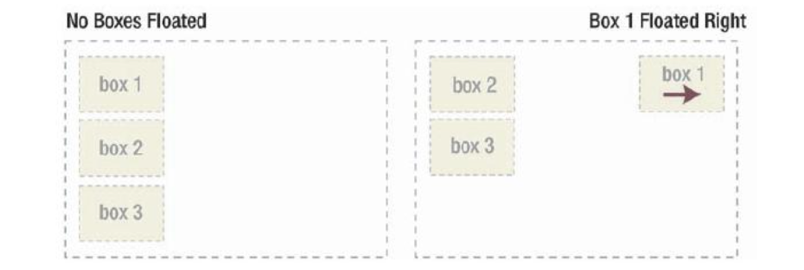
The float CSS property specifies that an element should be placed along the left or right side of its container, allowing text and inline elements to wrap around it. The element is removed from the normal flow of the web page, though still remaining a part of the flow.
How floated elements are positioned: when an element is floated, it is taken out of the normal flow of the document (though still remaining part of it). It is shifted to the left, or right, until it touches the edge of its containing box, or another floated element.
float: none|left|right|initial|inherit;
The float property can have one of the following values:
float first
When a container has multiple elements, some of them are floating, some of them are not, remember to put all the floating elements in front of the non-floating ones! Browsers try to figure out the spacing for those floating ones first.
clear
.clear { clear: both; /* it can be left|right|both */ }inline-block
Floating works great, but as you see we need to apply the .clear to clear out the floating even for a block element. There is another way to achieve the floating effect, that is to use inline-block display.
similar to inline, inline-block allows multiple elements to layout on the same line, the beauty of it is that elements can automatically wrap around if the wrapper container is too small, and if you add a block element right after an inline-block element, we don’t need to use the ugly .clear fix.
可实现左右排版
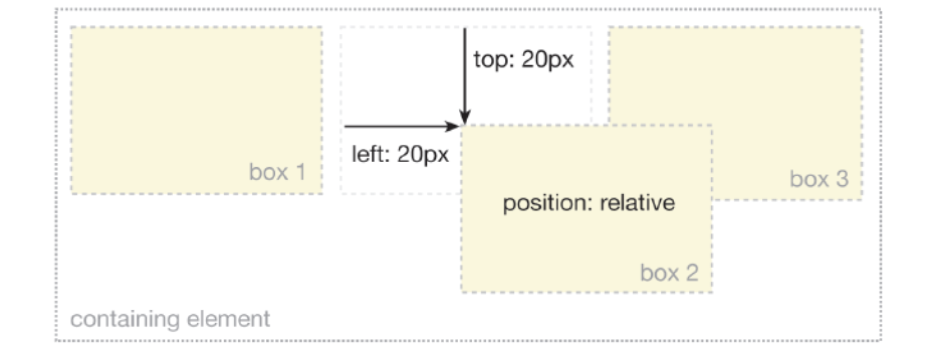
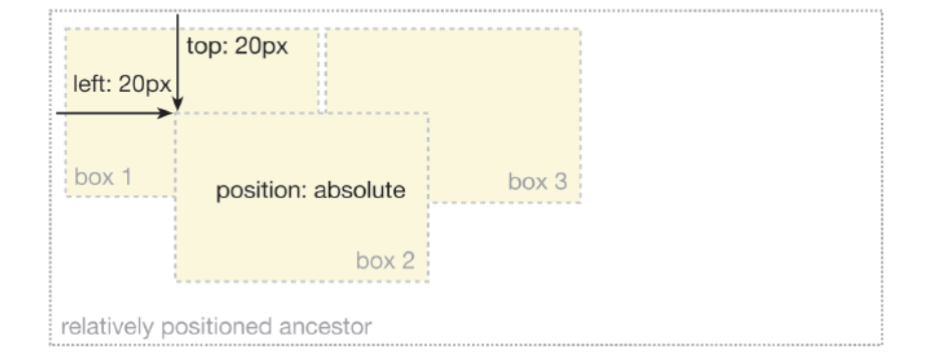
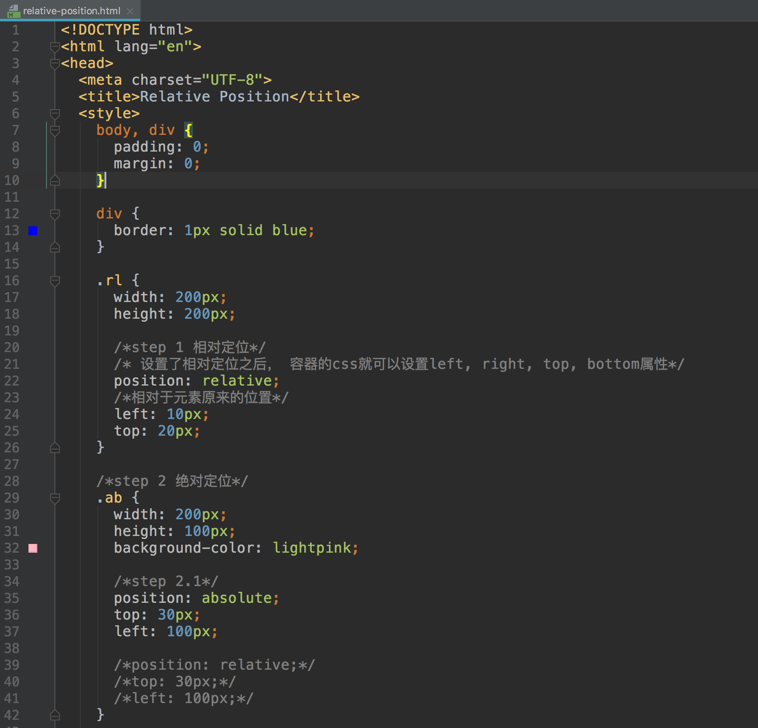
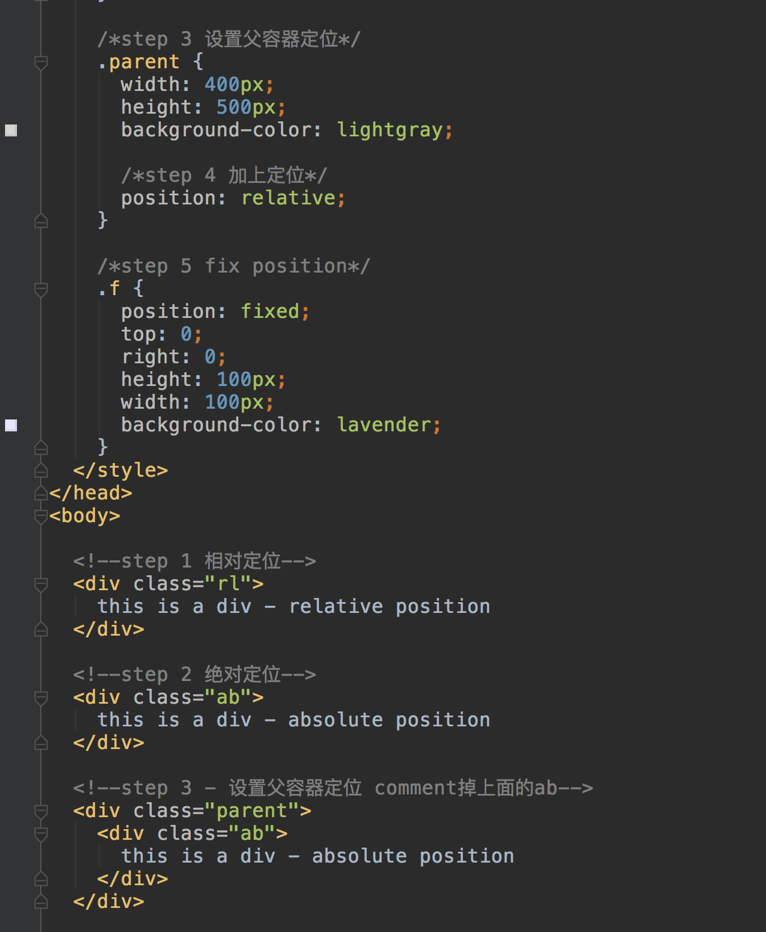

Trick: 子容器绝对定位(相对于父容器), 父容器相对定位。
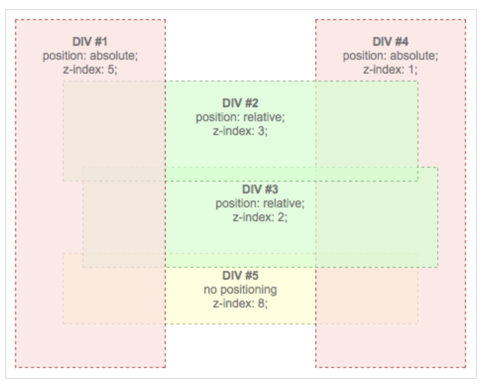
The z-index property specifies the stack order of an element.
An element with greater stack order is always in front of an element with a lower stack order.
1 | /** |
1 | // {"images": [{"url": "www.example.com/my_image.jpg"}, ...]} |
1 | // {"classifications" : [{"segment": {"name": "music"}}, ...]} |
1 | // Convert JSONArray to a list of item objects. |
1 | /** |
/**
 * @see HttpServlet#doGet(HttpServletRequest request, HttpServletResponse response)
 */
protected void doGet(HttpServletRequest request, HttpServletResponse response) throws ServletException, IOException {
    // TODO Auto-generated method stub

    double lat = Double.parseDouble(request.getParameter("lat"));
    double lon = Double.parseDouble(request.getParameter("lon"));

    String keyword = request.getParameter("term");
    TicketMasterAPI tmAPI = new TicketMasterAPI();
    List<Item> items = tmAPI.search(lat, lon, keyword);

    JSONArray array = new JSONArray();
    try {
        for (Item item : items) {
            JSONObject obj = item.toJSONObject();
            array.put(obj);
        }
    } catch (Exception e) {
        e.printStackTrace();
    }
    RpcHelper.writeJSONArray(response, array);
}